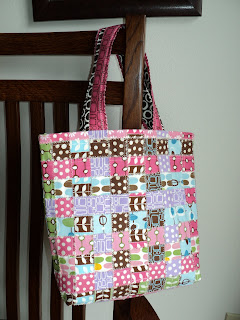
Finished Dimentions:
9.5x11x3 inches
Materials:
1 Jelly Roll
Special Supplies:
Pinking Rotary Blade
Instructions:
Step 1: Pick 2 strips from your jelly roll for the handles of the bag and set aside.
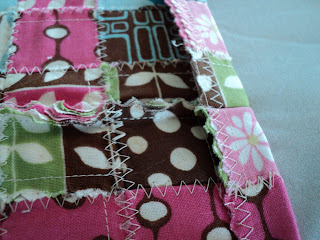
Step 2: Select 22 strips from the jelly roll for the body of the bag and do the following:
- Fold each strip in half lengthwise and press
- Stitch a 1/4" seam along the length of each strip on side with the pinking edging.
Step 3: Select 11 strips to be the vertical strips and cut these down to 28.5 inches.
Step 4: The remaining 11 strips will be the 22 horizontal strips of the bag. Cut twenty-two 13.75 inch strips.
Step 5: With the 11 vertical strips, chain-stitch a 1/4 inch seam on the edge of each vertical strip keeping each strip touching the next.
Step 6: Use a piece of masking tape and tape the 1/4 inch seam to a flat surface. This will help keep the piece sturdy for the next steps.
Step 7: Weave each horizontal strip between the vertical strips, pinning in place as you go. Once you have 4-5 horizontal strips, stitch a zig-zag stitch along the line where the horizontal strips meet.
Step 8: Once all the horizontal pieces have been weaved between the vertical strips, sew a zig-zag stitch along the edge of the first and last horizontal strips, vertical strips, and then between the vertical strips, securing all remaining strip edges in place.
Step 9: Using a pinking rotary cutter, cut along the original 1/4 inch edge. Next trim the opposite edge for any vertical strips extending beyond the last horizontal strip.
Step 10: Fold the piece right sides together, pin and using a straight stitch, sew a 1/4 inch seam allowance along each side to form the bag.
Step 11: Trim the resulting seam allowance with the pinking rotary blade being careful to leave most of the seam allowance.
Step 12: Spread out the opening of the bag and fold one of the seams into the center of the bag creating a triangle for the bottom corner.
Step 13: Keeping the fabric trued-up, set a ruler perpendicular to the side seam and find the spot that is 3 inches wide. Use a chalking tool to mark the line, pin the fabric together and then sew a strait stitch on the chalk line.
Step 14: Cut a 1/4 seam allowance with the pinking rotary cutter.
Step 15: Repeat steps 12-14.
Step 16: While right sides are still together, fold the top edge down making sure to match the placement of the zig-zag stitches and iron using lots of steam.
Step 17: Turn the bag right side out and pin the folded top edge into place. Sew a zig-zag stitch along the original zig-zag stitching to hold the turned edge into place.
Step 18: Making the straps:
- Cut two strips of interfacing, 41x2 inches.
- Iron the interfacing in the center of the wrong side of the two strips chosen for the bag's straps.
- Next, iron each strip in half lengthwise.
- Place the two strips on top of each other with the pinking edge facing opposite directions.
- Topstitch 1/8th in. front he straight folded edge of each strip.
- Follow up with a decorative zig-zag stitch over each of the straight topstitch lines.
- Cut the strip in two to make two handles and finish the edges with the pinking rotary cutter.
Step 19: Pin the edge of the handle to the inside of the bag. Following the outline of a square, topstitch around the square and then finish with a decorative zig-zag stitch. Complete this step for all four handle ends.
Note: In sewing the handle ends to the bag, I sewed from the outside of the bag to make sure I was following the lines of an existing square so the stitching that shows on the front matches the existing outside stitching.
Congratulations, you've completed the Jelly Roll Bag!!!


Cute!
ReplyDelete